Send International Orders
You can easily send international orders using our Shipping Manager, your central hub for booking and managing your shipments. This guide will walk you through the process step-by-step.
Before sending an international shipment, it’s important to check the specific import and export requirements for your item to confirm what documents need to be attached to your parcel.
During the booking process, we provide the key fields you’ll need for your customs invoice (also known as a commercial invoice or customs clearance form), but it’s still important to research what additional information your item or destination may require.
Follow the steps below to learn how to send your international orders through the Shipping Manager:
- Import Your Orders to Our Shipping Manager
- Complete Your Product Details and Customs Invoice
- Select Your Courier Service: DDU and DDP Services
- Choose Who Pays the Duties and Taxes
- Add Transit Warranty
- Add Customer Notifications
- Review and Finalise Your Orders
- Print and Attach Labels
1. Import Your Orders to Our Shipping Manager
- Log in to your Interparcel account, hover over My Shipping Tools and click Shipping Manager.
- You can fetch or create your orders in three different ways:
- Click Fetch Orders to import your orders from your connected ecommerce store or marketplace. If you haven’t connected your store yet, you can integrate it here.
- Upload your orders via CSV file
- Manually create an order using the Create Shipment button.
- Once imported, your orders will appear in the Shipping Manager.


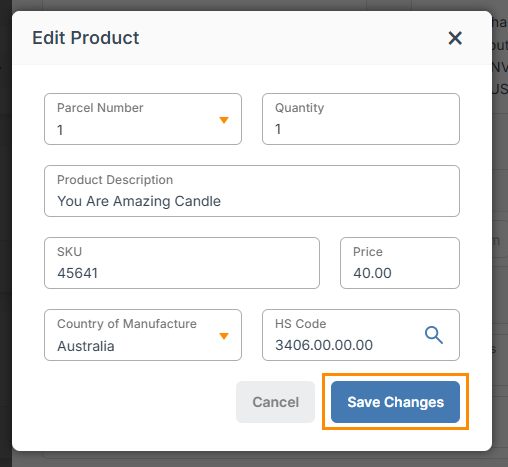
2. Complete Your Product Details and Customs Invoice
When sending goods internationally, you must provide a customs invoice (also called a commercial invoice or customs clearance form) with your product details.
- Click an order to open the shipment details window.
- Make sure your parcel details are correct. You can use Smart Boxing or Parcel Presets to automatically select the right box for your shipment.
- Fill up the Details Section:
- Description of Goods: Specify exactly what you’re sending.
- Value of goods: The total value of all items packed in the shipment.
- Order Reference: Optional.
- You’ll need to complete the following product details to generate your customs invoice:
- Products Section: Enter the following details for each item you’re sending. Click on each product to fill up the details:
- Number of parcels
- Quantity
- Description: Be as specific as possible, e.g. “Cottons Men’s T-Shirt.”
- SKU
- Price
- Country of Manufacture
- HS Code: Learn how to find the right HS Code here.
- Additional Customs Invoice Fields
- Reason for Export: Select the reason from the Customs Invoice drop-down (e.g. sale, gift, return).
- Additional Fields: Depending on the destination country, extra details such as an EORI Number, VOEC Number or IOSS Number may be required.
- Products Section: Enter the following details for each item you’re sending. Click on each product to fill up the details:


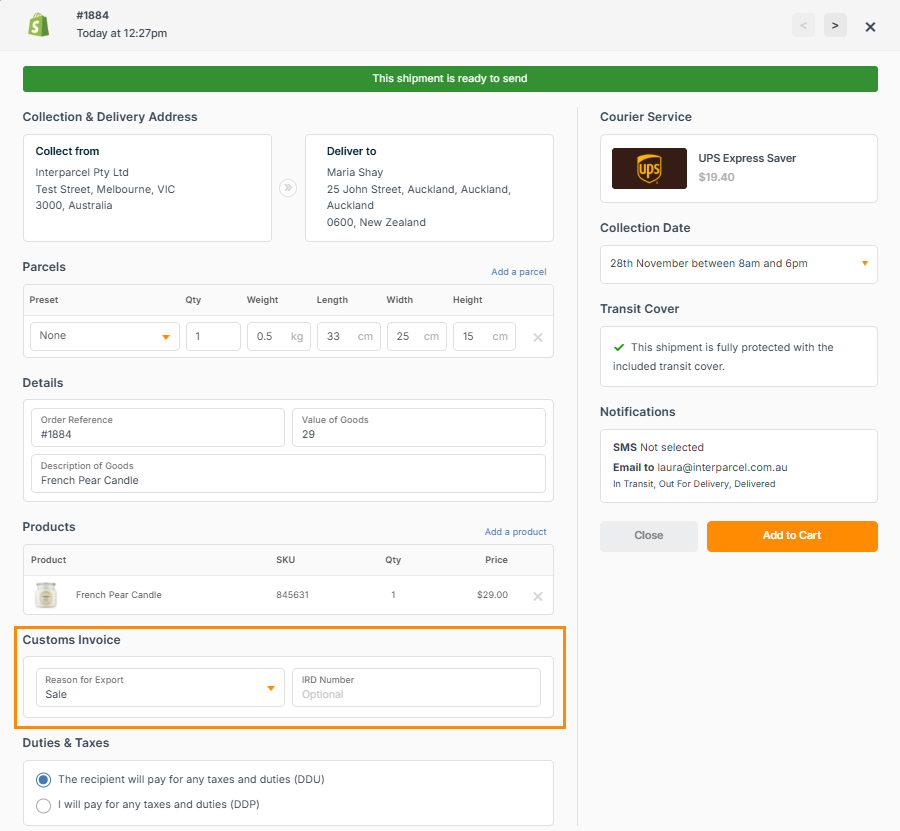
3. Select Your Courier Service: DDU and DDP Services
- Click Select Service to choose a service, or click the auto-selected option to view available courier quotes.
- Select the courier service you’d like to use. When sending international parcels, you can decide whether to prepay duties and taxes or have your customer pay them on delivery. If you’d like to prepay them in advance, choose a service with the Prepay Duty & Taxes tag. This doesn’t mean you must pay them, it simply means the service gives you the option to do so. Even if you prefer not to prepay, you can still select that service.


Please Note: If you're sending parcels to the US through Australia Post, you'll need to prepay duties and taxes and have an active account with Zonos. Learn more about this here.
Automate Courier Allocation
If you’re selling on Shopify or WooCommerce, you can display live shipping rates at checkout, and whatever option your customer chooses will flow straight into your Shipping Manager.
If you’re not using live rates, you can still automate your courier allocation through your Shipping Tools Settings. Learn how to automate courier allocation here.
4. Choose Who Pays the Duties and Taxes
After completing the customs details and selecting the courier service, you’ll be prompted to select who will pay the duties and taxes:
- If you choose The recipient will pay for any taxes and duties, the recipient will be contacted by customs in the destination country to pay the charges before delivery. If they don’t pay, the charges will be passed on to you as the sender, and additional fees may apply. If the duties and taxes remain unpaid, the shipment will be returned.
- If you choose I will pay for any taxes and duties (DDP), you’ll cover these charges in advance so the recipient won’t need to pay anything on arrival. This helps the parcel clear customs smoothly. The exact amount will be added to your shipment total.


5. Add Transit Warranty
Some international services include our $100 transit warranty, and some do not. To check whether your selected service includes transit warranty, or if you can purchase additional cover, look for the tags displayed on the service.

If the service includes $100 cover and your shipment is worth more than that, you can purchase an extra transit warranty.
- To do so, toggle on Transit Cover from the order details window.
- You can automate this process by adding Transit Cover to all shipments or specific ones through our Rule Manager.

Please note: Interparcel provides transit cover for the first $100 AUD of your shipment’s value, covering loss or damage. For items of higher value, you may purchase enhanced transit warranty of up to $2,000 for a fee equal to 2% of the declared value, with a maximum charge of $38* + GST. If your shipment is valued above $2,000, only $2,000 will be covered.
Transit warranty is not available when selecting an ATL service. Restricted items are only covered for loss, not damage. Prohibited items cannot be sent through Interparcel and Transit warranty will not apply under any circumstances if prohibited items are sent. Please refer to the list of Restricted and Prohibited items and our Terms of Use for more information.
6. Add Customer Notifications
You can add Email and SMS tracking notifications so your customers stay updated at every stage of the parcel journey. You can choose to send:
- SMS notifications for Out for Delivery and Delivered updates (additional $0.40 per SMS)
- Email notifications for Booked, On Its Way, Out for Delivery, and Delivered updates (free)
- Click the Notifications section in the shipment details window to choose which alerts to send.
- You can also automate SMS and email notifications through your Communication Settings.

7. Review and Finalise Your Orders
If you’re using your own courier and/or Australia Post rates on our platform, follow the guide on how to send your orders with your courier here.
Make sure your orders are ready to be sent:
- Update your Collection Date directly from the order listing. You can also set it to auto-select by enabling this option in your Shipping Tools settings.
- Use the three dots (⋮) next to each orders in your Shipping Manager to View Details, Duplicate, Add Notifications, Apply Smart Boxing, Generate Packing Lists, Put On Hold or Delete a shipment.
- Check for Order Errors: If any required information is missing, the order will appear in the Errors tab, which you can access from the My Shipments drop-down.
- Once everything is ready, tick the orders you want to process and click Add to Cart.
- Select the payment method you would like to pay with.
- Agree to the Terms & Conditions, and click Pay Now.


8. Print and Attach Labels
- Once payment is confirmed, click Print Shipping Labels and Commercial Invoice to print them directly using the Print Manager, or download the PDFs and print them if you don’t have it installed.

Make sure to:
- Print your shipping label and three copies of the commercial invoice.
- Attach them securely to your parcel using a document pouch, along with any additional required paperwork.
- If you need to reprint later, go to My Orders, open the order, and download your documents at the bottom of the page.
Other Relevant Guides
- Connect My Courier or Australia Post Account
- How to Set Up Your International Settings
- International Bulk Service: Asendia
Didn't Find What You're Looking For?
If you have any questions or concerns regarding your integration or how to send your orders, simply email us at shippingtools@interparcel.com.au, and we'll provide the assistance you need.